| Ā |
Applying
Textures |
By
default the current texture will be applied to any new brush you create.
There are two ways to change this. With the "Apply Current Texture Button",
or by using the "Texture Application Mode".ĀĀ
Ā |
ĀĀĀ |
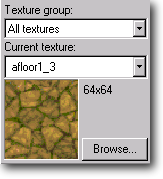
Selecting
a texture. To change the "current texture". Clicking the menu
button  next to the texture name will give you the most recently used textures,
followed by all the textures. The faster way to view all the available
textures is to click [Browse]. When you find the texture you
want just double-click it, the texture browser will close, and your chosen
texture will become the current texture.
next to the texture name will give you the most recently used textures,
followed by all the textures. The faster way to view all the available
textures is to click [Browse]. When you find the texture you
want just double-click it, the texture browser will close, and your chosen
texture will become the current texture. |
 Apply Current Texture
 |
Apply
Current Texture Button . Select the texture you want by using
the texture bar. The current texture will then be placed on all the faces
of any new brush you create. Or, using the apply
current texture button, you can apply the current texture to all
the faces of the currently selected brush. Ahh.. but what if you want
to only apply it to one of the faces you ask?...
ĀĀĀ |
 Texture Application Mode
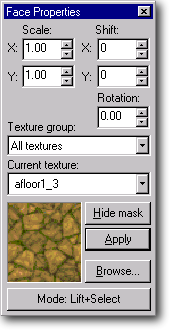
To make aligning
textures to your objects easier, try building your objects to the same
scale as the textures you plan to use. Check the texture browser for
different textures sizes. Whenever possible make your floors and walls
conform to the 32 or 64 unit grids.
Ā |
Texture
application Mode can be turned on by typing (Shift-A)
or by clicking on the Texture Application Mode Button. Then, using the
3D view, pick the face of the brush you want to edit. The face properties
window will open allowing you to adjust the texture settings. If you press
[shift] while selecting a brush face, the whole brush will be selected.
Scale is used to stretch the texture
along the "X" and "Y" axis. Fairly easily, you can take a 128X128 door
texture and fit it on any door, no matter what the size.
Shift
is used to move a texture along the "X" and "Y" axis. The main purpose
of this is to align textures. And example would be in creating a barrel.
You use WOOD1_5 texture which has a metallic band running around it.
When you first apply the texture the metal band isn't running around
the top of the barrel.  So, using the Shift texture control you adjust the "Y" axis until the
metal band lines up the way it should.
So, using the Shift texture control you adjust the "Y" axis until the
metal band lines up the way it should.
Rotate
allows you to rotate the texture on the face. This is great for getting
teleporter pads to align along any direction you might want.
Hide mask,
will hide the red mask that is seen on selected brushes so
that you can see what you are aligning better. Make sure you unclick
this when you are done, so that you'll be able to see which faces you
are selecting later. |
Right clicking on any face in any of the modes of
texture application mode will apply the current texture and values to
that face.
Ā |
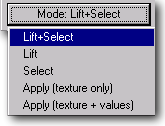
Modes:
texture application mode has several different modes. The default
mode is Lift + Select.
Here's a brief description of what they do.
Lift + Select: Lifts the texture and
values from any face left clicked on, and selects that face.
Lift: Lifts the texture and values from any face left
clicked on.
Select: Selects any face left clicked on.
Apply (texure only) Apply's the current texture to
any face left clicked on.
Apply (texure + values) Apply's the current texture
and values to any face left clicked on.
|
Ā
|
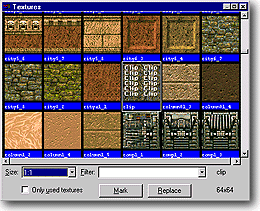
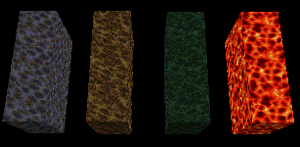
Expense
of textures is something that you need to keep in mind. While
there isn't really a limit to the number of textures you can use in your
level, there are two reasons to keep the number of textures reasonable.
First is caching delay, if you go from one room with a lot of textures
into another room with a lot of different textures, you will get noticeable
chunking as your machine caches the textures of the new room. Bad in Single
Player, terrible in Multiplayer. Second, every different texture that
you put in your level is added to the finished BSP file, resulting in
a larger download, and the possibility that not all systems will have
enough memory to run your level. |
 Texture Lock Toggle
ĀĀ
!
Texture Lock does not work when you rotate objects, their textures will
become misaligned.
Ā |
Texture
Lock allows you to move objects that have the texture aligned
without messing up their alignment. For best results, keep the texture
lock button off until you are moving objects that have the textures lined
up, and then turn it off again. This will keep the textures on adjoining
objects in the same alignment if you move them while creating them. |
!
You cannot have two brushes of different liquid types touching each
other, you will get errors (mixed face contents).
Ā |
Making
Water - Special Textures are textures such as water, lava, sky
etc. They have properties that are different than most textures. These
are all animated textures and have special properties, such that they
allow you to move through the brush, or can cause pain etc.
Making water is actually pretty darn easy, make a brush,
then select it. Select the water texture you want, and then click the
apply current texture button. Done, BSP will take care of the rest.
In order to work properly, all the faces of that particular brush must
have the same texture on them, so don't do anything funny with texture
application mode on liquid and sky brushes.
|
| Properly
aligned textures, and good textures in right places can make the difference
between a good map and a great map. You can spend hours working in a small
corner of the room until the textures are 'just right'. |
Ā |
| Ā |
Ā |