Ā
|
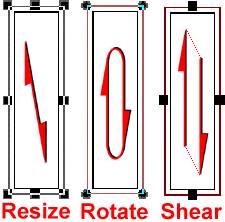
Resize,
rotate, and shear
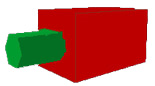
There are three basic operations you can use on a brush to move, resize,
rotate, or shear (slant) the selected brush. You change the operation
being performed by left clicking inside of the selection box. The position
of the handles lets you know which mode you are in. By grabbing the handles
and dragging you manipulate the brush. You'll
notice that when you make a spike, cylinder, or wedge they are always
orientated in the same direction. You can use rotate in the appropriate
window will make the object face the desired direction. In [Tools =>
Options] 2D views tab, you can click "Reorient primitives on creation
in the active 2D window". That just orients the block to the last 2D
window you clicked in before you pressed [Enter]
to create your object. You will want to play around with this a bit
to get used to it. |
 Clip Plane Tool
Clip Left
Clip Right
Split
Ā
|
Clip
Planes - (Clip Tool)
Clip planes essentially slice pieces off of brushes, or split brushes
and is quite easy to use.
First, you select the solid(s) you want to clip, then click on the Clip
Plane button. Then, click-drag a line across the solid. The clip
points can be rearranged by click-dragging them
Now, you can do three different things.
There are three different clip modes, Clip Left, Clip Right, and
Split. The current mode can be changed by repeatedly clicking on
the Clip Plane button. The red portions of the brush is the
part that will be discarded. To perform the clip, all you need to do
is press [Enter], after making sure it is set how you want.
It is possible
to clip across any number of brushes, as long as they are all selected
beforehand.
It's also possible to move the clip line around by holding Ctrl and
click-dragging it, so both clip points will move at once.
To start a new clip plane, hold Shift and click drag a new line.
The Clip Tool is
being considered by id software as a replacement weapon for the Lightning
gun for Quake2
:) |
 Vertex Manipulation Mode
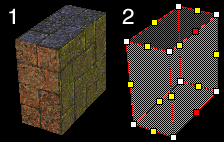
6 - Invalid
Brush (this is bad)
Ā |
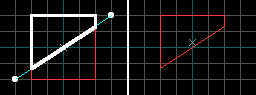
Vertex
Manipulation
Vertex Manipulation, one of the most awesome features of level editing
today, and Worldcraft's got it.
Vertex manipulation is quite simple to use. Select a
brush (1), and press the Vertex Manipulation button. The brush
will turn translucent. The vertices will be marked in white, and the
edges will be marked in yellow, currently selected points will be marked
in red (2). You can move any of the points in either the 3D or 2D window
by clicking and dragging. Click the select mode button to switch back
to normal select mode.
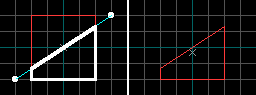
Vertex
Mode Face Splitting
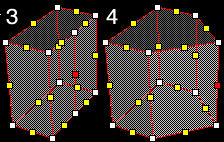
With the registered version, you can also split the face of
a brush. Select two edges (2), and press Ctrl-F. This will turn the
edges into vertices, and create new edges, splitting the face (3). You
can select the new edge and drag it outward (4). Click X to switch back
to normal select mode. This is a valid brush (5).
After you finish using vertex manipulation, you must switch back to
normal select mode, or the manipulations will not appear in your level
if you compile it right away.Ā
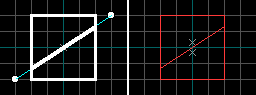
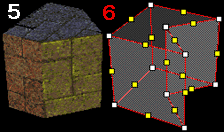
One must be careful
with vertex manipulation though. If the edge was moved in the opposite
direction in this example (6), it would form an invalid brush and would
cause errors. These errors can often be found by using [map => check
for problems], so it is important to use this after using vertex manipulation.
It is better, however, to learn how to not make invalid brushes. Simply
put, if a straight line can pass through more than two faces of a brush,
it is invalid. You may need to use two separate brushes to make your
intended shape.
You can split the
faces of a brush any number of times, however the more splits you add,
the higher the likelihood that you may create an invalid brush. |
 Carve
Carve
|
Carving
Left until last on this page for a reason. Carving, or subtraction as
it's sometimes called, is a fundamental feature of any Quake editor. However,
it is also the most likely to cause map errors if used wrong, and sometimes
even when used right. The most experienced level editors tend to avoid
this feature whenever possible. Carving
is simply removes or subtracts the volume of the selected brush from
any brush it is within. The brushes which are carved are often split
into fragtments or splinters to allow the remaining brushes to be valid
shapes.
Something that some
level designers who use carving will do is to copy the the brushes to
be carved into a new map, and do their carving there. Then copy the
finished product back into their good map. I'm not aware how much this
helps, because I don't use carving any more. Most brush actions and
shapes can usually be accomplished without the use of carving. |