| Ā |
The
Worldcraft Interface |
All
the buttons and parts of Worldcraft may make little sense at first glance.
With a little help you'll have them mastered in no time. Don't worry
about learning everything here all at once. You can use this page as
reference when you need it. |
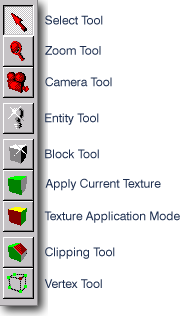
Map
Tools Bar allows you to select the tool you are using to work on
your map. |
 |
- Ā
- Select Tool
- Used to select
brushes and entities, then you can resize them, or drag them to different
locations.
- Ā
- Magnify Tool
- Used to zoom
in and out whichever 2D view the cursor is over. Left mouse button
zooms in, right mouse button zooms out.
- Ā
- Camera Tool
- Enables camera
mode. Allows you to place or move a camera in the 2D views, or navigate
the map in the 3D view.
- Ā
- Entity Tool
- Used to place
entities in the map.
- Ā
- Block Creation
Tool
- Used to create
brushes (blocks) within your map.
- Ā
- Texture Apply
Button
- Used to apply
the current texture to a selected brush or brushes.
- Ā
- Texture Application
Mode
- Brings up the
face properties editor. Used to align or resize textures, or put different
textures on the individual faces of a brush.
- Ā
- Clipping Tool
- Used to slice
from, or split a selected brush or group of brushes along any one
axis.
- Ā
- Vertex Tool
- Used to manipulate
a selected brush's shape by moving it's individual vertices.
|
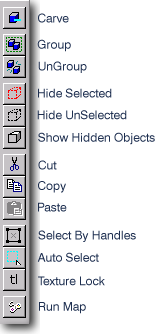
Map
Operations Bar allows you to perform actions on selected objects
in your map. |
|
- Ā
- Carve
- Removes the shape
of the selected brush from all brushes it is within
- Ā
- Group
- Takes the seleted
objects and groups them.
- Ā
- UnGroup
- Ungroups the
selected group.
- Ā
- Hide Selected
- Hides the selected
objects, creating a new vis-group with them.
- Ā
- Hide UnSelected
- Hides all the
objects which are NOT selected, creating a new vis-group with them.
- Ā
- Show Hidden
Objects
- Shows all objects
hidden in vis-groups.
- Ā
- Cut
- Cuts, or removes
the selected object(s).
- Ā
- Copy
- Copies the selected
object(s).
- Ā
- Paste
- Pastes object(s)
which have been copied or cut.
- Ā
- Select By
Handles Toggle
- Toggles whether
brushes can be selected by their edges and handles, or just handles.
The handle is the "x" at the centre of every brush.
- Ā
- Auto Select
Toggle
- Toggles auto
selection of everything surrounded in a 2D window, inclusive from
the front to the back of that window. When off, you must surround
exactly what you wish to become selected, and adjust the selection
in all three 2D windows, folowed by pressing "enter".
- Ā
- Texture Lock
- When engaged,
the texture lock maintains texture alignment on brushes that are moved.
Not effective when rotating brushes.
- Ā
- Run Map
- Brings up the
Normal or Advanced menu's for compiling and running your current map.
- Ā
|
Map
View Bar configures the different options for viewing the map. |

|
- Ā
- XY View (Top)
- Switches the
current window to XY view.
- Ā
- YZ View (Right
Side)
- Switches the
current window to YZ view.
- Ā
- XZ View (Front)
- Switches the
current window to XZ view.
- Ā
- 3D Wireframe
View
- Switches the
3D view to wireframe outline view.
- Ā
- 3D Polygon
View
- Switches the
3D view to plain polygon view.
- Ā
- 3D Textured
View
- Switches the
3D view to textured polygon view.
- Ā
- Toggle Grid
- Toggles drawing
of the grid on and off.
- Ā
- Smaller Grid
- Reduces the grid
size.
- Ā
- Larger Grid
- Increases the
grid size.
- Ā
|
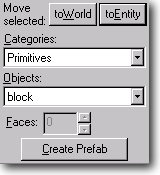
Object
Bar allows you to choose brush and entity types you add to your
map. |
|
- Ā
- Move Selected
"to World"
- Switches the
selected entity back to a normal brush(es).
- Ā
- Move Selected
"to Entity"
- Makes the selected
brush(es) become an entity, the properties box will come up for you
to select the type.
- Ā
- Catagories:
- When the Block
tool is selected, it will show the "Primatives", which is the group
of block, cylinder etc, also prefab libraries are accessed through
this menu.
- Ā
- Objects:
- This list contains
the objects that are in the above chosen category. When using the
entity tool entities will be listed, with the block tool block types
or prefabs will be shown.
- Ā
- Faces:
- This allows you
to specify the number of faces that a cylinder or spike will have.
- Ā
- Create Prefab
- Pressing this
button will take all currently selected objects and create a prefab
with them. A window will come up and allow you to name your prefab,
and choose which object library to save it in.
- Ā
- Insert Original
Prefab
- When a prefab
library has been chosen from the catagories window, this button will
appear. When this button is pushed, whatever prefab is listed in the
objects window above will be placed in your current map, at the same
size proportions and position as the prefab was created.
- Ā
|
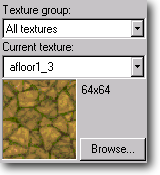
Texture
Bar allows you to choose textures, and shows the current default
texture for new brushes. |
|
- Texture Group:
- Allows you to
choose which of your installed WAD files you are using or browsing.
The default is 'all textures'.
- Ā
- Current Texture:
- Shows the current
texture's name, picture, and size.
- Ā
- Browse...
- Clicking this
will allow you to browse all the textures in the current texture group.
- Ā
|
VisGroups
Bar allows you to show or hide VisGrouped portions of your map for
various purposes. |
|
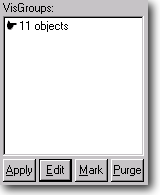
- Ā
- VisGroups
Window
- Shows your current
VisGroups. VisGroups with a this symbol => will be visable in the
2D and 3D views, ones with no symbol will be hidden from view, but
still exist in the map. Clicking beside a group will toggle whether
that group is shown or hidden. Any changes made will not take place
until you click apply. To create a new VisGroup, select one or more
objects and click the "Hide Selected Objects" button on the "Map Operations
Bar"
- Ā
- Apply
- Applies any changes
made in the VisGroups window.
- Ā
- Edit
- Edit existing
VisGroups names and displayed colors.
- Ā
- Mark
- If the visgroup
currently selected in the VisGroups window is visable in the 2D, 3D
views, all of it's contents will become marked, or shown as selected.
- Ā
- Purge
- Deletes any VisGroups
that no longer contain any objects.
- Ā
|
| Ā |
Ā |