![]()
| Ā | Building a simple room |
||
|
|
||
Whenever
you see the magnifying glass symbol The
blue stripe, |
Getting
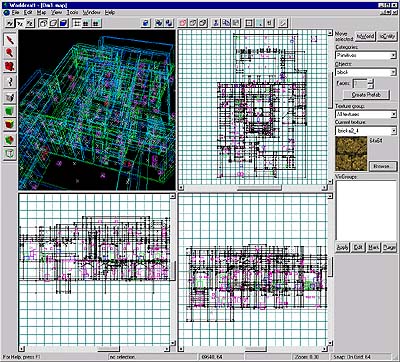
Started Okay, let's start building our own first map. First, load up Worldcraft and pickĀ[File => New]Āfrom the menus or hit [CTRL]+[N]. You will then get the standard 4 views used by most commercial 3D design programs. Clockwise from top-left are: 3D, Top, Side and Front You'll also notice the grids in the 2D views. Each square is, by default, 64 X 64 units. By comparison the player is 64 X 24 units. ĀĀ |
||
|
Creating
a Brush This is where we start actually making a room. Some people either figure this out right away or else this is one of the most confusing things they'll ever do. I'm going to go about this slowly, step by step. Select the brush tool from the tool bar . Click and drag to make a box in the TOP window about 10 squares X 10 squares. ĀĀ |
||
|
Making
a room To make the brush we've created into a room you'll need to hollow it out. To do that, switch to 3D polygonal, or 3D textured view, click on the selection tool and them click on the cube in the 3D view. The cube should turn red in the 3D view, and a selection box will appear around the cube in the 2D views. Then select the menu [ Tools => Make Hollow] or type [CTRL]+[H]. Pick the default thickness of 32. ĀĀ |
||
Many of the
actions or operations in Worldcraft can be accomplished with Quick Keys
|
Moving
in the different views Getting around in the different 2D views is pretty easy. Anytime you press the [space-bar] while the cursor is over a 2D window, the cursor will turn into a hand. When you see the hand, left-clicking and dragging the mouse will move the contents of the 2D window you are over. If you have "nudge" turned off in the 2D options, you can use the arrow keys to move whichever 2D window the cursor is over. Zoom is pretty simple too, select the zoom tool and hold the cursor over any of the 2D windows, then left click the mouse to zoom in, and right click to zoom out. Also, you can use [D] and [C], and the numeric keypad's [+] and [-] keys to zoom whichever 2D window the cursor is over, without having to switch to zoom mode. [D] and [C] will also zoom the 3D view. All of the normal number keys will also zoom any 2D window the mouse is over to preset amounts, making it quick to zoom in and then back. Grid size is important, for best results, work with a grid size which is the same as most of the textures, such as 32, or 64. This will make aligning textures a little easier, because you won't have to scale everything to fit your brushes. Of course not everything will be those sizes, so you will have to lower the grid size from time to time so that you can make smaller details. The " [ " and " ] " keys will raise and lower the grid size, as well as the grid buttons. You can also toggle the grid on and off using [Shift] + [R] or the toggle grid button. ĀĀ |
||
If you lose, or accidentally delete the camera, you can add another one. Simply switch to camera mode, and then hold [Shift], while holding [Shift] left-click-hold-drag a new one. If you have multiple cameras, you can switch them by using [Page Up] + [Page Down]. The Camera is covered in more detail in the advanced editing section of the tutorial. |
The
Camera Tool The camera tool allows you to place a 'point of view' within a level. What we're going to do now is place a camera inside the room so that in the next step when we create a pillar we can see what it looks like while we make it. First select the camera tool then click in the middle of the room in the top view. A small black dot will appear. This is the 'camera'. Now drag to the right and a line will follow. This is the direction the camera is looking. Once you place the direction let go of the mouse button. The 3D view will re-orientate to reflect the new camera position. You have the camera lined up in the top view but not in the side or front view so the camera may in fact be sitting 'above' the room. Click and drag the camera around in all 3 views so that it's sitting 64 units above the floor on the left side of the room. At this point you might want to play with the camera tool and the 3D views a little. With the camera tool selected, try dragging the mouse around in the 3D view. Note that the Left and right mouse buttons will do different things in the 3D view when dragging. Holding [Shift] while using the right mouse button will move in and out, while without [Shift] will move up and down with the right mouse button. |
||
|
The
3D Views You can switch the type of image being displayed in the 3D window - wireframe, solid, and textured - by pressing one of the 3d view buttons at the top of the screen. You will need to use different views for different jobs. Textured view for working with textures, solid or wireframe for viewing and working with objects etc. Changing to simpler views will also reduce the load on your computer, so if you need more speed, switch to solid or wireframe view. ĀĀ |
||
| Adding
a Pillar We're now going to add a cylinder to the middle of the room. Get the camera lined up at the left side of the room and just off the floor. Next, select the brush tool again and notice where it says block on the upper right hand side of the screen? Change it to cylinder. Then, create a new brush near the middle of the room, away from where your camera is. Make it go from the top to the bottom, and about 3 squares across. Don't worry if the cylinder is actually 'inside' the floor or ceiling - it won't cause any problems. When you have it where you want it hit [ENTER]. It will form a cylinder in the middle of the room. ĀĀ |
|||
|
|
Adding
some Entities Now we'll add a light and a player start to your map. Select the entity tool and change the type to "light_torch_small_walltorch". Click in any of the views and place the torch about midway up the pillar on the left side. You may have to resize your grid to get it exactly where you want it. Once you have it where you want it hit [Enter] to create it. Now do the same for the player start. Change the entity type to "Info_Player_Start" - the first one in the list - and place it at the left side of the room. Remember the player is 64 units high and 24 units wide, don't stick it in the floor or one of the walls. Hit [Enter] to create it. Use the 3D view to make sure everything looks right. Ok, it's time to
compile your first level and take a look. |
||
| Ā | Ā |
| [Previous] | [Table of Contents] | [Next] |